Friday, April 20, 2018

Sending pfx or p12 certificate using javascript


Recently I was stuck with a task where I needed to send .p12 file along with the request and since this certificate is different from the regular one, it will have to be sent in a different way.

The testing framework was in Javascript and we used chakram as the module to send the request which is using requests module underneath. It took some time to find out a working solution which I am sharing here. Hope this will help you.

Code
 var fs = require('fs');  
 var options = {  
   headers: { 'authrization':'' },  
   agentOptions: {  
     pfx: fs.readFileSync('certfile.p12'),  
     passphrase: 'passphrase',  
     securityOptions: 'SSL_OP_NO_SSLv3'  
   }  
 };  

Wednesday, August 23, 2017

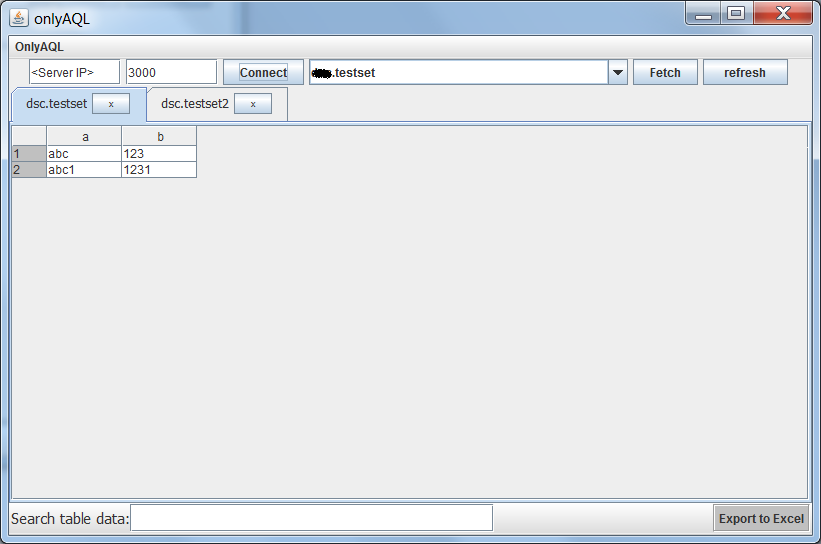
OnlyAQL - Aerospike GUI client

Right now it can only fetch records from Aerospike but we are continuously working on the improvement of this tool and will add other features also.


you can download it from : https://drive.google.com/file/d/0BylEbVLsc5L8OFB2eGNLWFFLQ0E/view?usp=sharing&resourcekey=0-UbNqAlEdmJbNr-j5FjIoHQ


Git hub link to project code: https://github.com/jain-neeeraj/OnlyAQL


Saturday, December 3, 2016

Storage in ServiceWroker while site is not running


Few days back while working with service workers I got caught with a unique kind of problem. I wanted to show notification data to the users in a dropdown and the tricky part was the notifications sent  while site was not open in any tab. I was not able to store that information as service worker cant directly use DOM. As site was not open in any tab, it couldn't post it to the site JS which could have inserted it to localstorage.

Fortunately, I was able to solve the problem. As a workaround I tried a very tricky implementation. It was based on the fact that ServiceWorker specifications said it can not access DOM and it cannot store values in browser storage but it did not said anything about the global variables. So, I stored the values in global Variable just by declaring an array outside of all the methods.

var notificationList = new Array();

Parsed information of notification is then pushed to this list from the Event Listner where serviceworker is listening to push event.

notificationList.unshift(parsedNotificationData); 

Now this notification information is available and stored inside the serviceworker which webpage JS can ask for on load.

Hope this was a bit helpful.

Sunday, June 5, 2016

Unlocking user account in linux


Your account might get locked when you enter incorrect password a number of time while doing SSH login and that account will get unlocked only after a certain amount of time.

If you want to unlock the account quickly then you would require root (or sudo) access to the system. But first you have to understand the way it works.

There is module pam_tally2 which is used to lock user accounts after certain number of failed ssh login attempts made to the system. This module keeps the count of attempted accesses and too many failed attempts.

This pam_tally2 module comes in two parts, first is pam_tally2.so and another is pam_tally2. It is used to examine and manipulate the counter file. It can display user login attempts counts, set counts on individual basis and unlock all user counts.


You can see if any failed login attempts by firing following command:
 $pam_tally2
The output will be as below:


If you want to check failed login attempt for any specific user then use the command as

$pam_tally2 --user=<userId>
The output will be as below:
To unlock any account there can be multiple approaches. This article will demonstrate all those approaches.
1.       Via reset command
a.       Fire below mentioned command
$pam_tally2 --user=<userId> --reset
2.       Via editing the config file itself
a.       Fire below mentioned command
$vi /etc/pam.d/password-auth
b.      Look for line
auth        required      pam_tally2.so deny=3 onerr=fail unlock_time=1800
c.       You can modify each of the parameters mentioned in last past of the line
                                                               i.      Deny = this defines the number of wrong password attempts to lock an account
                                                             ii.      unlock_time = this defines the amount of time for which account should get locked. The time is in seconds
d.      After you modify parameters as per your need. Just save the file and try to login via locked account.

Hope above mentioned steps helped you.